Friday, May 28, 2010
How to check the operating system installed on your computer?
Here is the answer
Follow these steps to check the operating system installed on your computer:
1. Click “Start” and go to “Run” to launch the “Run” window.
Or
Press the “Windows” and “R” keys at the same time to launch the “Run” window.
2. Type the following on the “Run” window and click “Ok” button:
Winver
I’ve added the screen shot here.
3. You will see the “About Windows” dialog box on your screen, the operating system will be listed on this dialog box.
I’ve added the screen shot here.
Thursday, May 27, 2010
How to check the version of the Internet Explorer on your computer?
Here is the answer:
Windows Vista / Windows 7:
1. Click “Start” and type the following in the “Search programs and files” text box:
Internet Explorer
2. You will see the “Internet Explorer” item in the list, click on it to launch the Internet Explorer window on your screen. (I’ve added the screen shot here)
3. When the Internet Explorer window is on your screen, press the “Alt” and “H” keys on your keyboard at the same time, you will see the “Help” menu item on your screen. (I’ve added the screen shot here)
4. Click the “About Internet Explorer” option in the list, you will see the “About Internet Explorer” dialog box, the Internet Explorer version will be listed on that window. (I’ve added the screen shot here)
Windows XP/Windows 2000:
In older version of Windows (E.g. XP and 2000), perform the following step to launch the Internet Explorer window:
1. Click “Start” and go to “Run”.
2. Type (or copy and paste) the following on the “Run” window and click the “Ok” button:
C:\Program Files\Internet Explorer\IEXPLORE.EXE
I’ve added the screen shot here
3. Once the “Internet Explorer” window is on your screen, follow the above mentioned steps 3 and 4 for the “Windows Vista/Windows 7” OS to check the Internet Explorer version on your Windows XP or Windows 2000 OS.
Monday, May 24, 2010
How to download any video from any website for free?
Here is the answer,
There are so many ways of downloading a video file from youtube or any other website.
I prefer Mozilla Firefox (This is one of the best web browser available and if you want the steps to download and install Mozilla Firefox click here ) for downloading any video, there are so many add-ons available in Mozilla Firefox among all those, I have used “Downloadhelper” and “Ant Video downloader” for downloading videos.
“Ant Video downloader” is my favorite and generally, I use it for downloading the videos.
So, here I will list the steps for you do download and install this add-on and use it for downloading videos:
1. Double click on the Firefox icon on your desktop.
2. On the Firefox window, click the “Tools” menu item and choose the “Add - ons” option.
3. You will see the “Add - ons” window on your screen.
4. Click the “Get add-on” Tab on the “Add - on” tab.
5. In the search box, type “Ant Video downloader” and hit the “Enter” key on your keyboard.
6. You will see the “Ant Video downloader” in the list; you can select it for the download.
7. On the “Ant Video downloader” is installed, close the Firefox window and re-launch it.
8. Now by default, you will find the “Ant Video downloader” on the status bar of the Firefox window and it will enabled only if there is any video on the webpage.
9. I am sure that no need to mention that you should click on the “Download” button on the status bar of the Firefox window to download the video.
If you wish to try the “Downloadhelper”, you can follow the same above mentioned steps with the name replaced as “Downloadhelper” instead of "Ant Video downloader".
Enjoy ;-)
User Account Control (UAC)
User Account Control is one of the newly introduced security features in Windows 7 (though it was in Windows Vista also) but most of us are not aware of it. However, sometimes, if you have enabled UAC and trying to install any application or trying to connect to a different computer, you may have problems. That’s why, I feel one should know how to control UAC on his/her computer to make sure s/he can enable/disable it as per the requirement and if have a question “how do I do that?” you will find the answer here. ;-)
Disabling/Enabling User Account Control (UAC) in Windows 7:
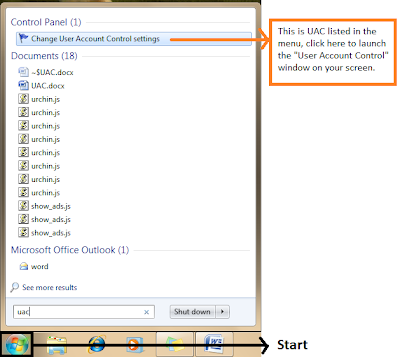
1. Click “Start” and type “UAC” in the “Search programs and files” field.
2. You will see the “Change user account control settings” listed in the menu, click on this item in the list. (I’ve added the screen shot here)

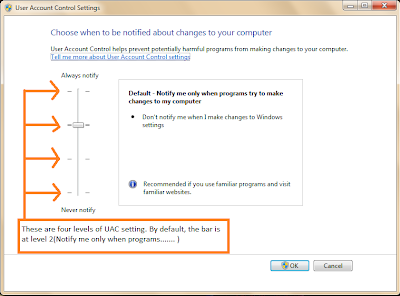
3. You will see the “User Account Control Settings” window on your screen.
4. To disable “UAC”, you need to drag the slider down to the bottom, “Never notify” position.
5. Click the “Ok” button. It may prompt you to restart the computer.
6. Whether it prompts or not, restart the computer so that the changes can take effect.
7. After restarting the computer, install the application/connect to a different computer or do whatever u want to do.
8. But make sure that once you are done, follow the same steps and enable the UAC to a level (There are four levels, “Never notify” is one of them) that is convenient to you. I’ve added the screen shot here.

Note: If you are curious about “UAC”, you should check the following URL:
http://technet.microsoft.com/en-us/library/cc709691%28WS.10%29.aspx
You can also Google it to find more details.
Enjoy ;-)
Sunday, May 23, 2010
Device Manager
Device Manager in Windows 7 or Windows Vista
1. Click "Start" and type the following in the "Search programs and files" text box:
Device manager
2. You will see the "Device Manager" item listed in the menu, click on it to launch the "Device Manager" window.
3. Generally, we launch the device manager to check if a particular device on the computer is working fine (here we can check whether the device drivers are properly installed or not).
E.g. If we have to check whether any Imaging Device (e.g. scanners, cameras etc) connected to the computer is working fine or not; we will locate the “Imaging Devices” item on the “Device Manager” window and then expand the list to check the devices listed.
To check the functionality of any Imaging device, you should double click on that device item and to the properties window for that device.
Here I have added a screen shot of the device manager window on my computer which shows the inbuilt web-cam on my computer listed under “Imaging Devices” window on the “Device Manager” window.

Subscribe to:
Comments (Atom)


