User Account Control is one of the newly introduced security features in Windows 7 (though it was in Windows Vista also) but most of us are not aware of it. However, sometimes, if you have enabled UAC and trying to install any application or trying to connect to a different computer, you may have problems. That’s why, I feel one should know how to control UAC on his/her computer to make sure s/he can enable/disable it as per the requirement and if have a question “how do I do that?” you will find the answer here. ;-)
Disabling/Enabling User Account Control (UAC) in Windows 7:
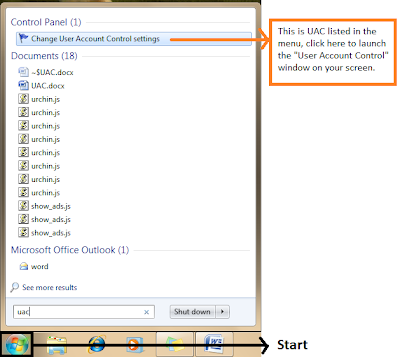
1. Click “Start” and type “UAC” in the “Search programs and files” field.
2. You will see the “Change user account control settings” listed in the menu, click on this item in the list. (I’ve added the screen shot here)

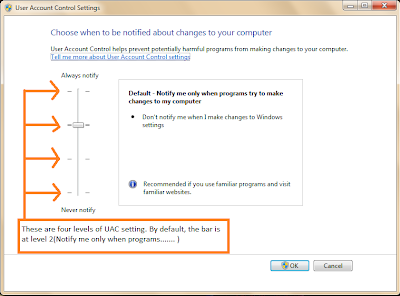
3. You will see the “User Account Control Settings” window on your screen.
4. To disable “UAC”, you need to drag the slider down to the bottom, “Never notify” position.
5. Click the “Ok” button. It may prompt you to restart the computer.
6. Whether it prompts or not, restart the computer so that the changes can take effect.
7. After restarting the computer, install the application/connect to a different computer or do whatever u want to do.
8. But make sure that once you are done, follow the same steps and enable the UAC to a level (There are four levels, “Never notify” is one of them) that is convenient to you. I’ve added the screen shot here.

Note: If you are curious about “UAC”, you should check the following URL:
http://technet.microsoft.com/en-us/library/cc709691%28WS.10%29.aspx
You can also Google it to find more details.
Enjoy ;-)

No comments:
Post a Comment